Showing posts with label guest post. Show all posts

29 August 2011

a nod to mod (a guest post by Sarah Beckman)

Hi there -- I'm guest posting for Olivia today. Olivia, we're all so glad you didn't blow away last night -- or lose power!

If I had to pick my favorite fashion trend right now, it would have to be mod. Mod makes me think of little skirts, big lashes, stripes, peter pan collars, pixie cuts -- all things that scream classy retro. I want to share with you my three mod inspirations.

A muse of Andy Warhol and a shopoholic socialite, Edie Sedgwick's fashion influence is still felt today. Edie was known for wearing her jazz ballet garb on the street. Leotards, shoulder duster earrings, tights, dark eye makeup, and fur were Edie's favorites.


Fun fact about Edie: After she shopped away her inheritance, Edie used waterpaints to do her dark makeup.

Gorgeous and gamine, Twiggy was the world's first supermodel. Her big, doe eyes  and pixie cut made her the "Face of '66." Twiggy was known for big patterns, big accessories, and pea coats.

If you haven't seen Rosemary's Baby yet, stop whatever you're doing and go watch it right now. Besides the awesomely eerie story, you'll see Mia Farrow wearing the most adorable tent and trapeze dresses of the 60s.

Tell me, do you love mod style? Who's your inspiration?

Author bio: Sarah's a bride-to-be with a love for vintage style and antiques. She works as an editor at Affordable Style.

14 July 2011

CAETARIUS Hair {guest post by Blythe}

         Hey, there this is Blythe from A Simple Farmgirl,though I'm usually known as Farmgirl here in the  blogging world.I love doing hair,so today I'm posting here at 'Of Horsefeathers' on how to do..............well I'll let you read and find out for yourself.  ;)
                                                                      'Enjoy'


       --------------------------------------------------------------------------------------------------
                                          The Fish tail braid. I've heard its a big thing in Califorinia.
                                       Though I've never been there,so I can't confirm that. :)
                               But that's what I heard,and it's a cool braid to learn popular or not. Aye?

                                                  A fun twist for your summer days right?
Since in the summer its usually hot,and most of the time.most of you go swimming,and fish swim and the braid is called a fish tail... yeah,okay I just.....uh......wanted to make sure you got the idea.......*cough*.....uhem......moving on.

    The Fish tail braid is a braid I've learned and its pretty easy.
       Trust me if you can french braid you'll be able to ace this braid. This is coming from somebody who is a horrible french braider,so don't worry if you can't french braid this is what I would call kind of a warm up for you before you attempt or reattempt the french braid.


-----------------------------------------------------------------------------------------------------
Well,lets jump right in to a little tutorial for this braid that is only 5 simple steps.


----------------------------------------------                 


1. take the section of hair that you are going to braid and divide it in 2.


                      2. Now keep your 2 sections seperate while you take a small piece of hair from your 1st section of hair as shown above,then bring it over and join it to the 2nd section,while still keeping your 2 sections of hair seperate. (Are you with me so far?)


3. Now by repeating step 2 take a small piece of hair from your 2nd section crossing it over and joining it to section 1,you now know the basic way to do a fish tail braid.


4. Repeat steps 2 and 3 until you are down to the bottom of your hair in which you may fasten with a elastic hair band.


                                                      5. Enjoy your new accomplishment.
-------------------------------------------------------------------------------------------------------------

Some advice regarding the fishtail braid....

             1. Don't be afraid to be a little crazy and try some weird things with the fishtail braid.I started with a basic one braid in the back,but then did a small section in the front pull it back for a half/princess look. You could even try to side fish tail braids.

             2. You can create different looks with how big or how little the pieces of hair that your taking from one side crossing and join with your other side.


             3. Try a fish tail as tight as you can and then try loose and see the different apperances.


I thought I would throw in a youtube tutorial video on the fishtail braid if my instructions were to hard to follow....


                                               Well,I hope you enjoyed this post.
      (to see other hairstyle tutorials go to my main blog and click on my Tutorial page.)

P.s. CAETARIUS is latin for 'fishy'
-------------------------------------------------------------------------------------------------------------


-------------------------------------------------------------------------------------------------------------

13 July 2011

You Are Beautiful {a guest post by Libby}

Hello there,
My name is Libby, and I'm going to tell you something which you should already know, although you probably don't realise it all the time--even though it's always true.
You are beautiful.
Do you hear {or, rather, read} that? You, my dear, are beautiful. And him, and her, and you too. It's true. Sometimes, you won't realise it. Sometimes, you'll be called names. Sometimes, you'll think that you are too fat, too thin, too tall, too short. Sometimes, you will think that you're the exact opposite of beautiful, but we know that you are beautiful.
Don't get beautiful confused with perfect. Frankly, we'll all get spots and dark circles and scars. But these spots and dark circles and scars don't make you ugly--they make you human.Oh--and you know that rumour, about how everyone apart from you is always immaculate? It's just a rumour! Because as much as I believe Kani, Elsie and Olivia are eternally gorgeous and perfect, they're not, because they're human. Some people are more photogenic than others, but that doesn't make them more beautiful, or you more ugly. Whenever I share outfit posts, I try and hide my face, because for a while I felt I wasn't good enough to share my style. But now, I'm getting more comfortable with realising that it takes time to be natural in front of a camera, and I know I'm not ugly. My hats are a fashion statement now, like below.
And please, promise me one thing: you will never let anyone else deny you your beautifulness because of what they say. Make a bumpy nose or a freckled nose or a wrinkly nose beautiful. Because, remember they are a part of you. And you are beautiful.

{this was written in nail polish, lipgloss & eyeliner}
So, yes, I like pretty dresses and flicky eyeliner and styling my hair. But to me, that's just pretty and an outer shell. I don't think that's quite the same as beauty. Beauty is more innate than that. It's also something creative, something unique, something just waiting for ignition. So create your utmost beauty not just through following a trend but through the poetry you writes, the colours you combine, the photos you take.
Go, be beautiful. Tell me, what makes you feel most beautiful?

xx
Libby

13 & 86 simultaneously.
a picture taker & pretty-thing maker,
also, word weave, & book reader.
dress lover,
tea drinker, {coffee too}
cat snuggler and a blogger.

12 July 2011

Easy Tips for Better Portraits (A guest post by Sara)

Why hello there! I'm Sara, a photographer who blogs at More Photos, Less Words. I'm here to share you a few quick and easy ways to improve your portrait photography. These tips are for everyone, from beginners to people who have been snapping for years. Hope you enjoy! :D


1. Shoot right before sunset.
The light on your subject can either make or break your photo. The light during most of the day is very harsh, which is why most photographers prefer to shoot in what we call "the golden hours". These are the few hours before sunset or after sunrise when the sun is lower. It's awesome because there's less shadows and it creates a warm golden tone on your subjects .

2. Create nice blurred backgrounds.
The background is a important because a distracting background can draw attention away from your subject. If you're using a point and shoot camera try taking a step back and zooming in to get a more blur behind your subject. For SLR shooters, use the zoom technique and go into Aperture priority and set the number as low as it will go. Both of the techniques will help you more blurred backgrounds.

3. Use back lighting.
During that golden hour of light you can really use the sun to your advantage. Try placing your subject with their back to the sun and you can get a beautiful back lit glow.

4. Frame your subject.
A great way to bring a little life to your portraits is to add a natural frame around your subject. You can do this with things such as a window, tree branches, or like I did with porch railing and roses.

5. Include a prop.
Adding in things such as bubbles, books, or pets are all great ways to add a special something into a photograph. I love having the subject bring along a hobby, such as musical instruments or sports equipment. It'll help you to create photos that really reflect who that person is.
6. Tell a Story.
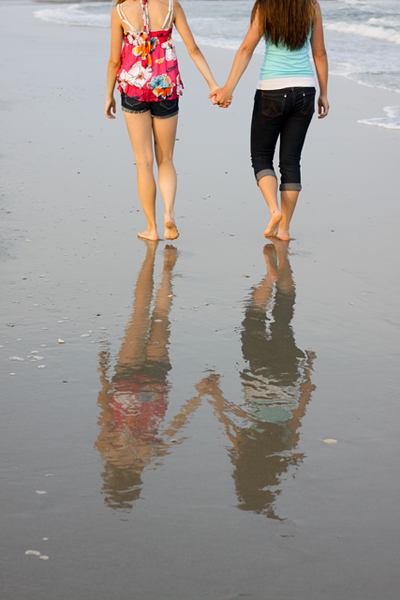
A fun way to do a portraits is to take a photo journalist's approach. Tell a story with the pictures. The photo above is mostly a reflection, but it shows the love of two sisters. Ask yourself, "what story can my photo share about my subject?"

7. Have fun!
Stay cheerful and positive with your subject. Work with them, get their ideas, and that's how you'll end up with photos of their truly reflect your subject.

- - - - - - - - - - - - - - - - - - - - - - - - - - - - - - - - - - - - - - - - - - - - - - - - - - - - - - - - - - - - - - - - - - - - - -


I'm Sara - a photographer, blogger, quirky homeschooler, baker, and follower of Jesus. I blog over at More Photos, Less Words. So come on over and visit! You'll learn about my life, photography, get a recipe or two, and learn about the Savior who I love serving.

10 July 2011

hazelnut cookies {a guest post by emily}

these cute little cookies make for a great snack, or dessert

cookies:
1/2 cups hazelnuts
1/4 cups (+ 3 tbs) sugar
3/4 cups flour
1 stick butter 
{toast hazelnuts in a shallow baking pan for about 6-7 minutes— using a towel, rub off hazelnut skins}

{pulse nuts and 1/4 cups sugar in a food processor, add flour and a little salt}

{add butter and blend until dough forms a ball (if the dough is too dry, add a bit of water)}

{mix in about 1/2 cup chopped bittersweet chocolate chips (optional)}

{split dough in two, and roll into this 11 inch logs — chill for 1 hour}

{cut logs into 1/2 inch slices, and place apart on a baking sheet}

{bake for 12-15 minutes — cool and dip in remaining 3 tbs sugar}

enjoy! :)

Hello... My name is Emily, and I am a blogger, photographer, and jewelry maker. I also love to paint, draw and experiment with any other of the arts that I can find. I love to go on adventures, explore, and travel. On my blog, you will find my photography, outfits, recipes, and whatever else is on my mind — come visit! :)

06 July 2011

Photoshop Tutorial (A Guest Post by Captivus Living)

Sorry if you get multiple postings today, friends of Olivia  :-)  I think things got confused, LOL! Olivia's email said for me to post on the 6th and so I shall! The show must go on! 

Hello everyone here at Olivia's part of the world! My name is Shaunna, blogger and creator of Captivus Living, my little part of the world where I showcase my best work related to my photography, Captivus Photography. I am honored and excited to share a bit of my photography knowledge with you all today as a guest speaker. If you are into photography and work with Photoshop, THAT is what I will be talking about today! I will be sharing a little tutorial on creating a summer, hazy look to your photographs in Photoshop. No need for actions! {Actions can become addicting and viewed as "important" to have in Photoshop, but it is actually not that necessary if you know how to work with Photoshop}. So let me show you how to create a summer, hazy look!

SOOC
EDITED

First, a tip to remember when wanting to enhance your images, duplicating your background (main layer) and selecting SOFT LIGHT in the layer options drop down menu, will automatically give the image a pop!


You would then adjust it so, according to your preference.

I then add a LENS FLARE by going to FILTER>RENDER>LENS FLARE.

I drag the "cross" to the upper left hand corner (in this case because the sun was coming from that direction). I keep my lens type "50-300mm Zoom". I bring the brightness (%) to about 175ish. Don't worry, this will be warmth up/smoothed down in the next step.

I then RIGHT CLICK on the background copy layer (or double click on the layer to bring up that window) and select BLENDING OPTIONS.

I select the GRADIENT OVERLY box on the left side of the pop up window. Make sure you have highlighted that option so you can edit the details of the gradient effects.

I then click on the gradient blended color bar (should have a blending of black and white). Another window will pop up showing you options of different styles of gradients. Keep it the the third style to the right (from left to right, the third option).


Down below that you will see SMOOTHNESS and arrows on the top, bottom, and middle of the gradient sample. DOUBLE CLICK on the bottom left arrow. A color window will pop up. Select a light orange color. I use #e9cd77, which you can type in on the bottom of that color pop up window. Click OK.

Now double click on the RIGHT bottom arrow. The color pop up window will show up again. Select a super light orange/yellow color. I use #fefaea. Select OK until you get back to the LAYER STYLE window.

You will see a little circle that says ANGLE next to it. Angle it -30. Where it says BLEND MODE above that circle, select SOFT LIGHT.


You can also leave that BLEND MODE as NORMAL, but then exit out and make sure to adjust the layer opacity down so you can see through it. This gives it a hazy look, which we plan on adding whether you choose SOFT LIGHT or NORMAL (thing to note: too much haze could be blinding or foggy).


Flatten your layers by going to LAYER>FLATTEN IMAGE.

Next create a new SOLID FILL LAYER by going to LAYER>NEW FILL LAYER>SOLID COLOR...

Keep it white.

Now adjust your FILL and OPACITY until you get the haze you desire for your image.

Now you may notice the sparkle dots across your image that is from the LENS FLARE. You can clone those out if you prefer (if it is crossing a face, which would not be flattering perhaps). To learn more about the clone tool, click HERE.

DONE!

Come by and visit my FREEBIES PAGE to grab some "presents"! Also you can check out my tutorials that I share for all kinds of techniques when it comes to Photoshop and photography. Even though I am not a fan of actions, I do give out free actions! Come check it out and see what you find if you are into these kind of things. Otherwise, check out my ABOUT ME page to learn more about who I am and what I do. Briefly I am a history major (about to start on my masters) and a professional photographer, a mother and a wife. I am from California, lived in Germany for a couple years, but now we are living in the Seattle area. Thanks for reading!


05 July 2011

A Tiny Taste of Peru (a guest post by Lynae Rockwell)

Before I write anything I'd just like to explain why this post says that it is by Larry Rockwell. That's my dad's name. He was signed into his google account when I clicked on the link to do a guest post for horsefeathers so it is under his name. My name's Lynae Rockwell, and I will be the one posting today.

Have you ever had a doughnut? That's probably a silly question. A better question might be... have you ever had a churro? I am a missionary kid living in Huaraz, Peru and churros are a doughnut-like pastry that is eaten here a lot. They are extremely fattening, and are basically sticks of fried dough filled with a caramel-y like substance (they are also dipped in chocolate sometimes). In this blog post, I will be sharing a recipe of how to make churros so you can enjoy a little bit of Peruvian culture right at home. I found this recipe online (courtesy of about.com) but this is the second recipe I tried because I wanted to make sure that they tasted like real Peruvian churros. I made this recipe twice and the second time around, everyone agreed that they tasted like churros you'd find here in Peru. Enjoy!


The Ingredients you'll need are as follows:

1/2 cup of water
1/2 cup of buttermilk
1/2 cup of butter
pinch of salt
1 1/4 cups of flour
1 teaspoon of vanilla
3 large eggs
vegetable oil for frying
1/2 cup of sugar plus 1 tablespoon
1 teaspoon of cinnamon
Manjar, Nutella, or chocolate to dip them in


Put the buttermilk, water, butter, salt and 1 tablespoon of sugar in a pot and bring the mix to a boil...


Stir in the flour all at once using a heat-proof spatula (I just used a wooden spoon. Keep stirring until it clumps together and forms a ball. Cook it for a minute or two more, turning the dough over in the pot with the spoon/spatula. Remove from heat.


Add the vanilla.


Add the eggs, one at a time, mixing well after each(just a little tip here - when i made this recipe the first time I used a spoon to mix everything... DON'T do that. Use an electric mixer). After you mix the first egg in your dough should look something like this...


The dough should be shiny looking, but still sticky enough that it doesn't slide around on your spoon/spatula. By the third egg your dough should look like this...


After you're done mixing in the eggs, put the dough in a pastry bag fitted with a star tip that has an opening at least 1/2 inch wide. I didn't use a star tip for mine, in fact i just put it in a pastry bag without a tip on it and hoped for the best. I would advise using a star shaped pastry tip if you have one.


Start heating up your vegetable oil.


While you wait for the oil to heat up, mix the 1/2 cup of sugar and cinnamon together and put the mixture on a plate or in a pan so it will be ready to roll the churros in.


Once the oil is heated, pipe dough into the pan, making the churros about 4-6 inches long. fry them for about 2 minutes on each side until they're golden brown.


Let them cool on a plate lined with paper towels...


While the churros are still warm, roll them in cinnamon in sugar.


If desired, you can also dip churros in dulce de leche or nutella. Normally churros are filled with something called manjar (which is very similar to dulce de leche) or chocolate but filling churros can be a little tricky so I just dipped mine in manjar...


Enjoy your churros!!


OK, so now that you have made some Peruvian food and hopefully enjoyed it, here are a couple of songs that are pretty popular here that you can listen to while you eat your churros. These artists are not necessarily from Peru, but their music is listened to alot where I live. A style of music called reggaeton is very popular here.


This first song is pretty catchy (a little too catchy actually... I found myself humming the tune to this long after I had finished listening to it). It is called Danza Kuduro...


This song is by a band called Camila that actually is from Mexico but is popular here. It is called Alejate de Mi (the music video is a little weird just so you know) ....


Well, I hope you enjoyed your churros and the music. Both of those songs should be available on iTunes. Thanks for reading and I apologize for being so late to post this!! Hasta Luego!

-Lynae Rockwell


PS I also have a blog of my own called One Summer that I haven't been posting on very often (but hope to start posting again soon) which you can find here -

http://lynaerockwell-onesummer.blogspot.com/


Also I have a flickr account which you can find by going here -

http://www.flickr.com/photos/60095568@N02/

read about